A JSON configuration utility for Perfect Swift

I’m getting myself further into Perfect Swift server…

A JSON configuration utility for Perfect Swift
Download JSONConfig from GitHub

In the previous post, my Acronym sample starter for getting SSL working on your server, in Environment.swift, I hard coded stuff like ports. Sure, some of the things would change depending on conditional compilation, but that’s not the best way to go.

Better is an external file that contains configuration information.

iamjono has a great little utility that uses JSON. However, the JSON file is flat. I can’t organize the configuration information into groups. With JSON, more can be done than a flat file.

In the JSONConfig utility I posted on GitHub, you can set the source for your JSONConfig and then get values based on a key path.

For example, suppose your configuration JSON file looks like this:

{
    "server": {
        "name": "www.your-domain.com",
        "port": 80
    },
    "database": {
        "host":     "127.0.0.1",
        "username": "db_bob",
        "password": "bob_password",
        "database": "db_bob"
    }
}

In your project code, you an access values by key path.

let serverName = JSONConfig.shared.string(forKeyPath: server.name")

The default value for a String at a path is “”. You can specify something else. For example:

let serverName = JSONConfig.shared.string(forKeyPath: "server.name", otherwise: "sub.your-domain.com")

In the current release, I’m just providing convenience routines for string, integer, double, and bool. I’ll provide other data types soon. Regardless, you can get a value at a key path using:

let it = JSONConfig.shared.value(forKeyPath: "your.path.to.value") // Any?

As a last note, it is always good to validate your JSON. There are lots available online. 🙂

Perfect Swift Server Starter with SSL

I’m building an iOS app that will need a web service for the data management. I’ve looked at Firebase and CloudKit. Both are very good options but they are not going to quite fit my need with this project.

Normally, I would roll my own backend using PHP and MySQL. They are both quite familiar to me and I’ve built a number of my own frameworks to make my life easier with them. But… this is also a very good time to lift my head up and see what else is on the terrain.

Building a Perfect Swift Server Starter with SSL App
Download Acronym Project from GitHub

When Apple announced that Swift is open source, that was very exciting to me. I enjoy the language and with more people participating in its development, the quicker and the cooler the improvements would come. Swift 3 was a big change, as reflected in all the little things I had to fix in my code to migrate it from 2 to 3. But, Swift 3 seems to represent a major milestone in the language development.

In looking for back end solutions, I also looked at what was happening with Swift on the server. I found Ryan Collins post on medium.com, “Current Features & Benefits of the Top Server-Side Swift Frameworks,” very helpful. Where Perfect shines is important to me and where Perfect falls short isn’t that important to me. So I picked Perfect to examine further.

After perfect.org, my first stop was Ray Wenderlich with the great set of tutorials for Perfect.

I have a ubuntu 16.04 server that I’ve been using for Node.js and APNs. It wasn’t very hard to get going on the server. Follow the instructions found on their Getting Started page. Of course, you’ll need to also install swift. There is an script you can get from Perfect-Ubuntu or you can go Download Swift from swift.org.

The Perfect Assistant is super handy. Make sure you download/install that.

But, before you get too far down the road, get the PerfectTemplate running on your Mac and on your Ubuntu server. Once that’s running properly, we can move on to the next steps.

The next steps consist of building a basis for MySQL StORM then getting and using a certificate for https.

Ray Wenderlich’s tutorial videos talks about using PostgreSQL for its database backing for StORM. I’m wanting to use MySQL. Swapping MySQLStORM for PostgresStORM is trivial. Watch the whole series from Ray Wenderlich. The videos are short and informative.

In main.swift of my Acronym project, you can see that I’m not putting everything into main. I’m placing routes into controllers that conform to a ControllerProtocol. Database access is also separated out into an ORM object and an API class. It’s a step towards more SOLID coding.

You will also notice that I’m using a class called Environment (for the lack of a better name). Environment has a static variable isXcode that is true #if Xcode. Based on that variable, I return different values for things like serverPort. I’m also initializing the MySQLConnector in a static func in Environment. How to setup a MySQL database on your server is something I’m not going to cover here.

In Environment, you’ll also see that the serverName is returned as “sub.your-comain.com” — this will need to be updated to your actual domain.

Out of the box, Acronym will start the server on port 80 on Linux. It also will serve static files out of ./webroot with the FilesController. This is important to get the LetsEncrypt Certbot installed. Read the excellent post by Jonathan Guthrie titled Easily Secure your Perfect Server Side Swift code with HTTPS for instructions on how to install the LetsEncrypt Certbot.

The first step is to install certbot with the following:

sudo add-apt-repository ppa:certbot/certbot
sudo apt-get update
sudo apt-get install certbot

Because the Acronym app is serving up static pages out of ./webroot, when you run the following command, the certbot will be able to confirm your website by adding and removing some data in a specific path in ./webroot.

sudo certbot certonly --webroot -w /the/path/to/Acronym/webroot/ -d sub.your-domain.com

A couple notes here: 1) replace /the/path/to/Acronym/webroot/ with the actual path, and 2) replace sub.your-domain.com with your actual domain.

If all works well, you will see out put that ends with something like:

...
Creating CSR: /etc/letsencrypt/csr/0000_csr-certbot.pem
IMPORTANT NOTES:
- Congratulations! Your certificate and chain have been saved at
/etc/letsencrypt/live/test.mydomain.com/fullchain.pem. Your cert
will expire on 2017–09–18. To obtain a new or tweaked version of
this certificate in the future, simply run certbot again. To
non-interactively renew *all* of your certificates, run “certbot
renew”

Success! Now to you just need to do a couple things in Environment.swift to get Acronym to run on port 443.

  1. Have the serverPort method return 443 when !self.isXcode.
  2. Check that the keyPath string in the tls method is the same as what was stated after the “Creating CSR” above.

Now you can rebuild Acronym and launch it. When you direct your browser to https://sub.your-domain.com, you should see the little closed lock showing up!

Gradients in SpriteKit

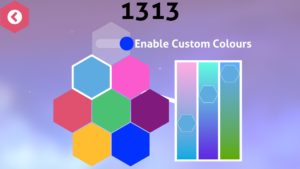
In 1313 : Puzzle Game, I wanted to add a way for the players to customize the colour of the shapes. Colour blindness can make some of the default colours hard to distinguish from each other.

The easiest way to adjust the colour is to provide sliders for red, green, and blue components. I had code kicking around from ages ago, from a drawing game called Draw Breaker, but I couldn’t find it easily. So, I decided to search for a solution.

One of the top hits was a blog entry by Maxim Bilan called Sprite Kit Gradient. Very nicely written and easy to follow. I was a bit hesitant to use a CIFilter but if it works, 差不多就行了吧.

I quickly reworked Bilan’s code into my own. And it worked for both macOS and iOS. Cool.

But. It was way way too slow. That was my worry about using a CIFilter.

Gradients are not going to be fast anyhow but my first run at the code didn’t have a very large texture to work with. I was very unhappy with the performance.

Then I remembered that I had used CAGradientLayer in Draw Breaker.

Putting the parts together, here’s the code to make a simple gradient.

#if os(OSX)
    typealias CSImage           = NSImage
#else
    typealias CSImage           = UIImage
#endif

extension SKTexture {
    convenience init( color0:SKColor, color1:SKColor, size:CGSize ) {
        let layer = CAGradientLayer()
        layer.frame = CGRect(origin: CGPoint.zero, size: size)
        #if os(OSX)
            layer.colors = [color0.cgColor, color1.cgColor]
        #else
            layer.colors = [color1.cgColor, color0.cgColor]
        #endif
        let image = layer.image()
        self.init(image: image)
    }
}

extension CALayer {
    func image() -> CSImage {
        #if os(OSX)
            let width = Int(bounds.width * self.contentsScale)
            let height = Int(bounds.height * self.contentsScale)
            
            let imageRepresentation = NSBitmapImageRep(
                bitmapDataPlanes: nil,
                pixelsWide: width,
                pixelsHigh: height,
                bitsPerSample: 8,
                samplesPerPixel: 4,
                hasAlpha: true,
                isPlanar: false,
                colorSpaceName: NSDeviceRGBColorSpace,
                bytesPerRow: 0,
                bitsPerPixel: 0)!
            imageRepresentation.size = bounds.size
            
            let context = NSGraphicsContext(bitmapImageRep: imageRepresentation)!
            
            render(in: context.cgContext)
            
            return NSImage(cgImage: imageRepresentation.cgImage!, size: bounds.size)
        #else
            UIGraphicsBeginImageContextWithOptions(self.frame.size, false, self.contentsScale)
            
            self.render(in: UIGraphicsGetCurrentContext()!)
            
            let image = UIGraphicsGetImageFromCurrentImageContext()
            UIGraphicsEndImageContext()
            
            return image!
        #endif
    }
}

In the code above, the resulting gradient will be color0 at the bottom and color1 at the top. I’ll leave it up to you to make the code more general.

One way to improve the speed of making a gradient texture is to reduce the width. In 1313, I’m making the texture a couple pixels wide and has tall as the slider. With CAGradientLayer and the 3 sliders I’m using, that does the job.

More GKMinmaxStrategist

With WeGame Corp, I’m redoing a game I wrote under Cetuscript called Krok. Krok is my version of Crokinole, a Canadian favourite. The rules in Krok are basically the same as Crokinole with some, in my opinion, minor tweaks.

My original game allowed up to 4 players to play either by sharing a device or by connecting through Game Center. I’m not sure if this rewrite will have network play. The jury is still out on that and the deliberations might become an article on this blog. However, the upcoming version will have bots to play against. So, if you can’t find any friends to play Krok with, you’ll still have the bots.

Playing Krok requires the evaluation of a starting point for your puck, a target for your puck, the angle to hit the target, and how hard to hit your puck. And all that boils down determining a position and a vector — four floating point values.

I used the GKMinmaxStrategist for Hexin, a two player chess like game. It was pretty easy to use. When I was thinking about how to do the AI for Krok, I thought about using a GKStrategist. The GKMonte​Carlo​Strategist seemed like it would be good. It advertises to be able to search a large space of alternatives by taking a random samples. However, it seems to be only looking for the win. I still needed to assess each random sample for its value.

That brought me back to the GKMinmaxStrategist. Of the four characteristics listed in that link, Krok provides “Sequential”, “Adversarial”, and “Perfect Information”. The game isn’t “Deterministic.” 3 out of 4 is pretty good.

Because the game isn’t deterministic, in fact even the AI players will execute their moves with error, there isn’t any point in searching far ahead. The maxLookAheadDepth is set to 1. I also set the randomSource to GKARC4RandomSource().

The GKMinmaxStrategist relies on evaluating all the possible moves for a given game configuration. With Krok, the number possible shots (moves) is infinite, or as many as you can generate with 4 doubles. In the gameModelUpdates(for:) method, I generate a large number of random and specific shot samples and then evaluate the shot in apply(_:) and score(for:).

A number of starting points are picked at random. For each starting point, each possible target is considered. For each possible target, ending points are determined at random. For each pair of starting point and ending point, the velocity is also randomly assigned.

Starting/ending points are also filtered out by obstruction. If the puck can’t travel between the start and the end points without hitting another puck or one of the 8 pegs, that pair is discarded.

Thus we have a number of random starting points and velocity vectors to consider. For each set, the resting positions for the shot puck and the target puck are calculated. For this calculation, I make a number of assumptions and simplifications. What I want to get to is a good guess at where the pucks will end up. I didn’t go into exhaustive detail because I didn’t want to do the math and I didn’t think the gain in precision would be worth it. After all, the actual shot will have an error applied to it. A good guess is good enough.

Where the shot puck and the target puck end up determines the value of the shot. The shot puck’s value is further modified by an estimation on how easy the shot would be. The harder the shot, the less valuable the shot is. While the value for the target puck isn’t modified by how hard the shot would be, it is the difference between the value of the target’s original position and the value of the predicted resting position.

The Shot, or GKGameModelUpdate structure, contains the starting position, the velocity of the shot, the value for the shooter, and an optional value for the target. It is optional because sometimes there is no target to shoot at.

In apply(_:), the active player’s score is modified by the value for the shooter and the opponent who has the target puck gets their score modified by the optional value for the target. In score(for:), the board score is calculated and return for the value of the board for the particular player the method was called for.

I’m doing the physics in gameModelUpdates(for:) rather than apply(_:) mostly for convenience. The data needed to calculate the core of the shot, the position and velocity, are all found in generating the shot in gameModelUpdates(for:). By taking the calculations a step further, the work to be done in apply(_:) is very simple. However, if I feel the need to evaluate the results of a shot in greater detail, I will move the calculations to apply(_:).

The benefit of using GKMinmaxStrategist is that it provides an easy to use framework for evaluating a large number of randomly generated samples. My coding contributions are confined to what is model specific. The strategist takes care of the rest.

Using GKMinmaxStrategist

I wear many hats. One of those hats is writing games. You can find the games I’ve written as Cetuscript Systems or WeGame Corp.

Hexin is a space chess game and I wanted a reasonable computer opponent for the players. I written a chess/checkers like game previously (not currently available) and my quick and dirty AI was okay-ish but not very challenging. For Hexin, I wanted something better.

With Hexin too, I wanted to explore the new game frameworks from Apple. GameplayKit is one of those new frameworks and it supplies a number of strategists classes. The GKMinmaxStrategist looked like it fit my requirements.

Tweaking the model for GKMinmaxStrategist was interesting. For my chess-like game, it boiled down to figuring out how to calculate a score for a particular board.

At the beginning, I tried working out a score by the value of pieces in the game. Hexin has three areas of the game: hanger, deck, and board. Pieces move from the hanger to the deck to in play on the board. Where the piece is determines if it is in play or how soon it might be to be put in play. Pieces in the hanger are not as valuable as pieces on the board.

A simple value of a player’s current pieces worked but not very well. The Strategist would know to improve the value of the player’s position but it didn’t recognize disaster to the plan. The Strategist would send its pieces on suicide missions.

To adjust for this, I had to also account for the move after. I was a bit worried about this because I didn’t want to spend the time writing an AI for the game. The Strategist should give me a reasonable opponent without going Deep Blue.

But, in the end, it seemed that accounting for the move after was enough to give me a reasonable opponent.

func score(for player: GKGameModelPlayer) -> Int {
    guard let who = player as? ModelPlayer else { return GKGameModelMinScore }
    
    let disaster    = GKGameModelMaxScore * 2
    let foolish     = 0
    
    let friend = who.side
    let enemy = friend.opponent
    
    let friendReach = self.evaluateReach(side: friend)
    let enemyReach = self.evaluateReach(side: enemy)
    
    var friendTotal:Int = self.evaluateValue(friend: friend) - self.whosePlaying[friend.rawValue].value
    var enemyTotal:Int  = self.evaluateValue(friend: enemy) - self.whosePlaying[enemy.rawValue].value
    
    var friendScore:Int = 0
    var enemyScore:Int  = 0

The friendReach and enemyReach are the next moves. Based on the current game, what can a player reach.

The friendTotal and enemyTotal are initialized with the difference between the initial value for the player and the current configuration value for the player. This gives the sense of are we better or worse off than when we started to figure out our next move.

    for (coord,_) in enemyReach {
        if let unit = self.board.units[coord], unit.side == friend {
            if unit.flavour == .Station {
                enemyScore += disaster  // this is a bad move
            } else if unit.flavour == .Portal && self.clusters[friend.rawValue].station.inHanger {
                enemyScore += disaster  // this is a bad move
            } else {
                enemyScore += unit.flavour.value
            }
        }
    }

I then go through the enemy’s reach. In the game, Stations and Portals are critical to play. The object of the game is to take the opponent’s Station or prevent the opponent from getting their Station onto the board by taking their Portal. If the enemy can take your Station, it is a disaster.

    for (coord,result) in friendReach {
        if let unit = self.board.units[coord], unit.side == enemy {
            if let _ = enemyReach[coord] {
                // this is a location that the enemy can take. not the best move.
                friendScore -= foolish
            } else {
                if unit.flavour == .Station {
                    friendScore += GKGameModelMaxScore
                } else if unit.flavour == .Portal && self.clusters[enemy.rawValue].station.inHanger {
                    friendScore += GKGameModelMaxScore
                } else {
                    if result == .Power {
                        friendScore += ValueForFighterPowered
                    } else {
                        friendScore += unit.flavour.value
                    }
                }
            }
        }
    }

Foolish is putting your piece into harms way. But I found that giving foolish a non-zero value didn’t help much.

Taking the opponent’s Station or Portal wasn’t weighted the same as the disaster of losing your own. Over weighting the victory lead to suicide missions. Also, in the game, there are power-ups. Using a power-up needed to be accounted for.

    friendTotal += (friendScore * TakePowerValueFriendFactor)
    enemyTotal += (enemyScore * TakePowerValueEnemyFactor)

The TakePowerValueFriendFactor is slightly larger than TakePowerValueEnemyFactor. The friendScore is given a bit more weight than the enemyScore.

    let diff    = friendTotal - enemyTotal
    var value   = max( min( GKGameModelMaxScore - 1000, diff), GKGameModelMinScore)

There is a gap of 1000 in the pinning of the score. This allows for the move that wins the game to be detected.

    if self.isLossForSide(side: who.side) {
        value = GKGameModelMinScore
    }
    
    if self.isLossForSide(side: who.side.opponent) {
        value = GKGameModelMaxScore
    }
    
    return value
}

My goal in using the GKMinmaxStrategist was to present a computer opponent that wouldn’t be too easy to beat, that would give enough practice for a player so they could learn the game. The model that I’ve tweaked to, I think, does that.

Hexin is available for macOS and iOS. And it is free 🙂

APNs Auth Key with HTTP/2 and PHP

I am not new to Apple Push Notification Service so when it came time to revamp a projects APNs setup I first cringed then took a deep breath and then went to the start of the mountain mule trail that is the process of getting this task done.

The trail is full of arcane cryptography spells and linux rituals. But it all starts with visiting the Apple developer site and getting two certificates: one for the sandbox and one for production. As I went to the Apple developer site, I knew that the next steps would be to flip through the spell books stored in Google for the spells to turn what I got from Apple into what I could use in PHP.

I started with the sandbox certificate and it was the familiar process of requesting a request from my local Keychain assistant then presenting that request to the Apple developer site to get the little scrape of text that would become a pem with the appropriate crypto-rituals. This is a yearly ritual both tedious and familiar.

Next I went to get the production certificate. But instead of being sent to my local Keychain assistant, I could only pick up the magic APNs Auth Key that promised to never expire. And the key would open both the door to the sandbox server and the door to production server. Also, once downloaded, the key would not be presented again. Ever. A magic key that could open both doors and never expire sounded good. “But what’s the catch?” came the quiet voice inside my head.

The catch was that my servers in this project can’t use the key.

The mountain that this mule trail winds its way through has a complex topology with many valleys and passes. I am sure there are easier passes out there, but to find these passes you’d have to start on different trails. My trail starts with PHP. Perhaps if my trail started with Node.js or Ruby or something else, the pass across the mountain could have been found easier. But that is not relevant.

With the APNs Auth Key in hand, the first step is to try to figure out if there is a map to this trail. Flipping through Google, you’ll find the APNs Provider API on the Apple developer site. The API uses HTTP/2 network protocol with JSON Web Tokens (JWT) for authentication.

The easy part of the trail was the creation of JSON Web Tokens. There are a number of PHP packages that will handle this for you.

The first catch is that Apple’s APNs servers are using HTTP/2. So that means that I rebuild curl for HTTP/2.

Second catch is that they need openssl 1.0.2. I don’t want to mess around too much with recompiling a lot of things so I look at a couple flavours of Linux that Goole cloud will set up for me. Both Debian and Centos won’t play nice with me.

But there is Ubuntu 16.04 with openssl 1.0.2 out of the box!

So all I need to do is set up another server to handle the APNs stuff. But…

Of course at the start of this mountain trail, I came across this very helpful tutorial: Send Push Notifications to iOS Devices using Xcode 8 and Swift 3. Of course, the title of the tutorial isn’t complete. They missed the really important part. They should have added “and Node.js v4.” My trek down this arduous trail was to avoid adding Node.js to one of my other existing servers.

At some point though, the best path is to ditch the trail. I have stuff that isn’t broken, doesn’t need to get fixed (yet) on an existing server. If my map to my mountainous trail involves setting up another server, I don’t need to stick with PHP.

So. I fired up the Ubuntu 16.04, installed Node.js, and installed the various packages to support the apn.js script. All very easy.

The next step was to get what needed to be posted. For that, I opened an endpoint on my api on the primary server to query for stuff that needed to be posted. Done and working just fine.

As a side benefit, I’m using this new server to handle various other timed functions with Node.js. That functionality is no longer sitting on the primary server.


In the end, I must apologize. The title of this blog posting is “APNs Auth Key with HTTP/2 and PHP” but I don’t tell you how to do that. Instead, my advice is to find or configure a server that handles HTTP/2 and openssl 1.0.2, and then install Node.js v4 to send your notifications to Apple’s server.

NSPersistentDocument and Swift

It’s been a while since I’ve worked with NSPersistentDocument. My last dabbling with it was back in the days of Objective-C. Ahh Objective-C. Oh, and I was using xibs instead of storyboards.

With xibs, the user interface file had an object called “File’s Owner” which would be a handy reference right directly to my subclass of NSPersistentDocument. That would give me easy access to the all important managed object context (moc).

With Objective-C, I could conveniently override the - (id)initWithType:(NSString *)typeName error:(NSError **)outError method in NSPersistentDocument to populate a newly created document with whatever entities I wished.

Easy. Or at least it was easy after I had figured all that out some 5 years ago.

Now it is easy again but I had to burn up a couple of days figuring it all out all over again.

Stuff I learned over the weekend…

Where to start… let’s start with populating your subclass of NSPersistentDocument when it is instanced for a new document.

You can’t override a convenience initializer in Swift. Well… actually you can but then you lose all the goodness that comes from NSPersistentDocument version of the convenience initializer. Inconvenient? You betcha. That was the way I could populate a new document in the old days. But we love Swift so we will find a workaround.

I looked all over the Internet for this workaround and didn’t find anything satisfying. But what I did do is quickly read this “Discussion” in the documentation for managedObjectContext:

If a managed object context for the document does not exist, one is created automatically. If you want to customize the creation of the persistence stack, reimplement this property in your custom subclass and use your implementation to create the appropriate objects.

Quickly reading this I got “blah blah create blah objects.” So I thought this might be the hook to populate a new document with entities. It seemed to work. I could add stuff to the moc. The storyboard would show what was created in the interface. Seemed to be working.

But not saving. I was adding stuff to the moc before it was ready. The place I’m looking at now to populate the document is at the end of the override func makeWindowControllers() method. I don’t know if this is the best place to do it but a) it works, b) all the goodies that NSPersistentDocument needs to create are in place at this time. It might be better at the start of the method… but stuff is working as it is so… I’ll poke the bear later.

My populate method needs to check the state of the document and add things that are missing. In the old days, I’d know what the state was and it wouldn’t be required when opening an existing document.

Next… getting that all important managedObjectContext in the storyboard. Or “The Magic of the RepresentedObject.”

I only really like magic in my D&D games or in the movies and definitely not in my code. But the representedObject in a NSViewController is magic. If you don’t cast this spell just right, the magic won’t work.

I asked and answered the question on stackoverflow so you can see the details there.

Things that don’t seem to work…

I saw somewhere that someone wrote in makeWindowsController: windowController.contentViewController!.representedObject = windowController.document Don’t do it. Even though it seems to be right (didSet in the controller’s representedObject shows the right object being setted), the magic didn’t work for me.

Don’t try to be tidy and create a method to skirt around the Model Key Path of self.representedObject.managedObjectContext in your storyboard. Your tidy method will look tidy and right but the magic won’t work. At least it didn’t for me. And I tried many many different variations.

Anyhow… looking at it all now, it is all pretty easy. It just took the weekend to tease it all out.

In summary, In Swift, NSPersistentDocument doesn’t have a handy spot to hook in populating a new document like Objective-C had. I’ll have to test every document created to see if it is populated or not and go from there. And with storyboards, representedObject is your new temperamental friend. Treat it nicely, pass it nicely around to other view controllers, and it will give you much moc.